Weld Details
The weld details area shows when a weld is selected.
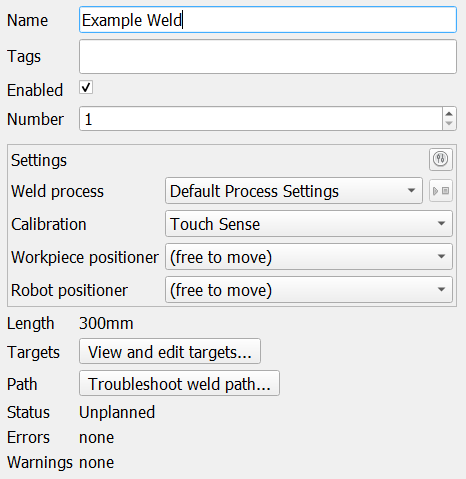
The weld detail area
Name: The name of the selected weld(s). This can also be used to edit the names of multiple welds by typing before or after the
<mutiple>to add a prefix or suffix to the weld names.Tags: Tags associated with the selected weld(s). To add a tag type in the tag followed by the space-bar. These are useful to quickly refer to weld using the weld filter.
Enabled: Sets if the weld is enabled. Only enabled welds will be passed to the planning process and the included in the generated program. This enables a user to control which welds are planned or exported. Note that program optimisation works with the currently enabled welds, if this is changed planning may be required to create the optimised paths.
Number: If the weld is enabled, the weld number in the program. This can be modified to move the weld up / down in the program.
Settings: Sets and displays the weld settings applied. You can click the button next to “Settings” to open a dialog to edit these.
Weld process: Configures the settings used for the weld process. You can click the button next to the dropdown to specify a different process setting for only the start and/or end of the weld, see below for more details.
Calibration: Configures the settings used for the part calibration.
Workpiece positioner: Changes the settings used to move the workpiece positioner.
Robot positioner: Changes the settings used to move the robot positioner.
Length: The length of the weld.
Targets: Open the Target Editor, which allows the modification of individual targets that make up a weld.
Troubleshoot weld path: Open the selected weld in the Weld Path troubleshooter, for diagnosis of planning errors.
Status: The current planning status of the weld.
Errors: A list of all planning errors for the weld. Any errors will deem the weld planning status as failed.
Warnings: A list of all planning warnings for the weld. Warnings will not cause the planning status of the weld to be failed.
Info: Planning information generated by the planning processes.
Start and End Weld Settings
To set separate process settings for the start and/or end of a weld, click the  button. This will open the dialog below which allows you to set different process settings for the start and/or end of a weld. This feature is currently only available on ABB and FANUC robots.
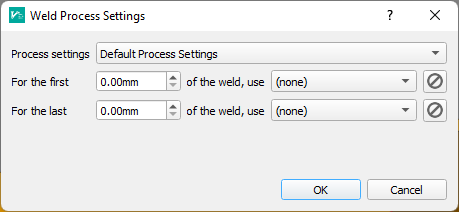
Dialog to set start and end process settings.