6. Weld Planning
Tutorial
This tutorial will walk you through how you can turn your identified welds into planned pathways for your robot to follow.
Prerequisites and Resources
Before starting with the tutorial, ensure to have the Universal Robots UR10e example cell downloaded and imported into Verbotics Weld. This cell is available to download from the examples page on our website.
Additionally, this walkthrough uses the weld planning example project which can be downloaded here.
Video Tutorial
Step by Step Guide
Step 1 - Plan Welds Options
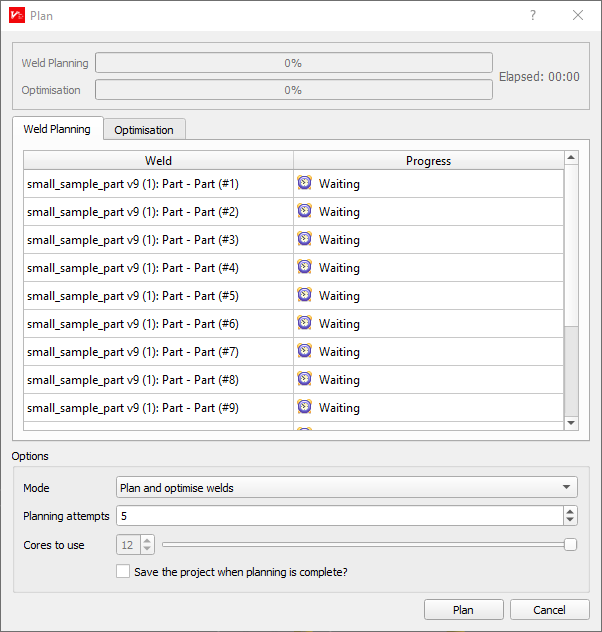
The example project used for this tutorial already has several welds identified and prepared for a small sample part. The next step for these welds is to plan the program and therefore the motions required for our robot to execute each weld.
To plan these welding pathways, locate and select the plan welds button in ribbon menu. This new window is the plan welds function, which displays every welds that still requires planning and the options related to them. Before we start the planning process, we’ll ensure that each of these options is adjusted properly.
The first option is the mode option, which we can use to specify whether to only plan welds, to only optimise planned welds, or to both plan and optimise welds. Since we don’t have any welds planned, but we still want our newly planned welds to be optimised, we’ll select the last option.
The option proceeding is planning attempts. Planning attempts allows you to specify how many times Verbotics Weld should repeat the weld planning process for a single weld until it either successfully plans the weld, or reaches the max attempts we’ve set. More attempts can improve the chance of difficult welds being planned, however often it is better to adjust your weld settings or part layout in order to achieve better quality welds which are easier to plan.
Below this is the cores to use option. For this option, you’ll notice a slider allowing you to limit how many cores in your pc to dedicate to the planning operation. The default for this is always the maximum to improve the time taken to plan welds, however if there are other tasks you need to perform while verbotics is running, you can reduce this as needed.
The final option available is save the project. This checkbox lets us specify if the project should save itself once the planning process is completed. This is useful as it guarantees that if we can’t observe the entire process, we won’t lose any data if our computer turns off at any point after this process completes. As many larger projects will take a significant period of time to complete the planning, this allows you to comfortably complete tasks elsewhere knowing your project will be saved.
Plan Welds Function
Step 2 - The Planning Process
Now that the planning options are specified, we can start the planning process. In the bottom right of the plan welds window, click the plan button.
Verbotics Weld goes through 5 stages of planning for each weld:
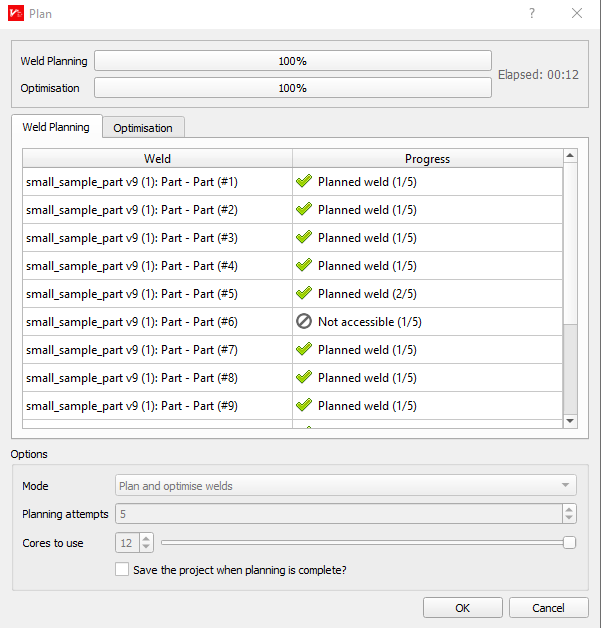
Completed Plan Welds
The planner attempts to create the weld path within the bounds specified in the selected weld settings.
The planner creates the approach/retreat motions (how the robot approaches then moves away from each weld)
The motions for calibrating the robot for each weld are created
Any remaining motions for the robot are created
Final validation checks are completed before successfully planning the weld
As an extra stop, if optimisation has been selected, the planning will also have 3 attempts to optimise each weld planned.
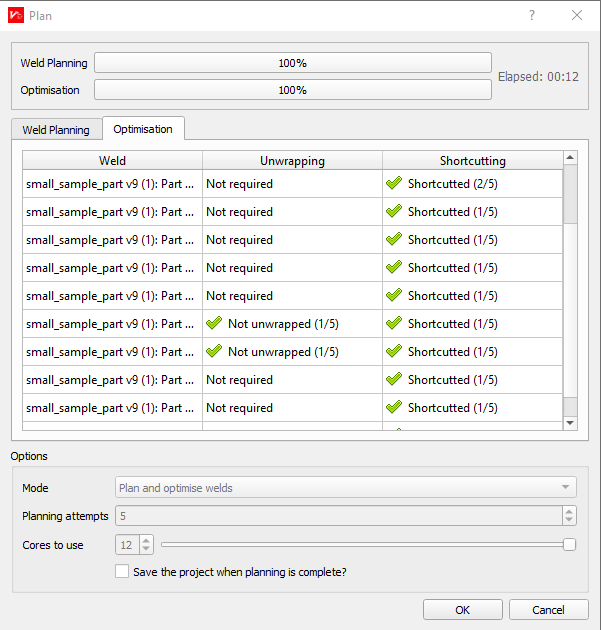
Weld Optimisation
Now, the planning process has successfully completed! However, you may notice not every weld has been successfully planned. This doesn’t mean these welds are impossible to plan though, these welds just weren’t able to be completed within first 5 attempts. While sometimes this can just be due to a difficult weld, often this can also be an indication that the weld settings for that weld aren’t optimal, that the part itself may be positioned in a way that obscures specific welds or many other cases. As such, it’s recommended to have a closer look for failed welds for certain issues before replanning.
For now, click OK and the function will save all our successfully planned welds. For this project, we know that the cause of failed welds are merely due to difficult locations. As such, return back to the plan welds function and attempt to replan these. In the function, you should see only the welds which were failed to be planned are identified as still needing planning.
Making sure that the planning options haven’t changed, go ahead and try to plan these welds once again.
With that, we’ve successfully planned all of our welds. If we navigate to the program tab, we can see all of our planned motions and welds planned are displayed in the order of their operations.