14. Workpiece Positioner Settings
Tutorial
This tutorial covers the workpiece positioner settings you can adjust in Verbotics Weld.
Prerequisites and Resources
This tutorial will cover a deeper look at the workpiece positioner settings you can adjust in Verbotics Weld. These were looked at briefly in the Weld Settings Overview tutorial. If you haven’t completed that tutorial, it’s recommended that you visit that first to get a general understanding of all the various options in weld settings.
Before starting with the tutorial, ensure to have the ABB FlexArc example cell downloaded and imported into Verbotics Weld. This cell is available to download from the examples page on our website.
This walkthrough also uses the workpiece positioner example project which can be downloaded here.
Video Tutorial
Step by Step Guide
Workpiece Positioner Configurable Settings
Let’s get started by navigating to the weld settings. Next, we can go ahead and create a new Workpiece positioner settings by selecting the workpiece positioner option from the left, then clicking the plus button located in the bottom left of the window. Here we can see 2 options and a table.

Workpiece Positioner Options
The only option outside of the positioner configurations is disable motion during welding. Enabling this option allows us to lock the positioner during welding but allow it to move between welds.
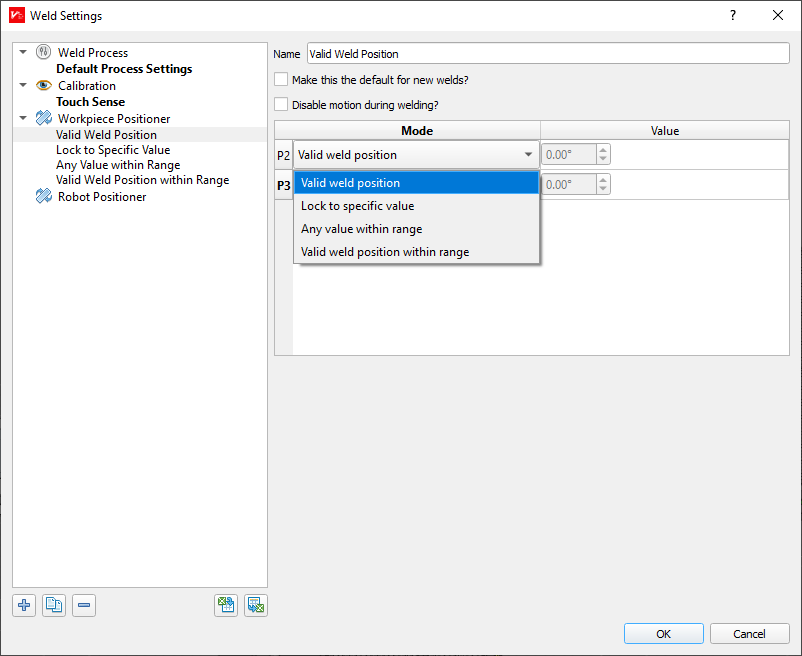
Below this option are the configuration settings which directly influence the allowable positions of the workpiece positioner. Each joint of the positioner is able to have a specific positioner configuration applied, of which the 4 available options are:
Valid Weld PositionLock to Specific ValueAny Value within RangeValid Weld Position within Range
For each of these options, a workpiece positioner setting has been created to showcase each configurations effects. Which we’ll go through now:
Valid Weld Position
This first configuration allows the positioner to move freely to different positions as long as the current weld is valid. By default, the workpiece positioner will be set to this configuration. Return to the viewer and select one of the example welds, then adjust the workpiece positioner setting to be set to Valid Weld Position.
Using the slider for rotation 1 in the weld path troubleshooter, you should see the positioner is able to be freely moved unless it’s impossible for a valid weld to occur in that position.
Lock to Specific Value
This configuration locks the workpiece positioner in a specified location. For the configuration we created, we’ve locked it at 40°. Apply the Lock to Specific Weld Setting to one of the example welds, then attempt to adjust the rotation 1 slider. You’ll notice that shifting the slider has no effect and the positioner is locked.
Any Value within Range
The third configuration allows you to define a range that the positioner is restricted to operate within. In the example project, the workpiece positioner settings we’ve created for this has been locked to a range of -40° to 30°. Apply this setting to one of the example welds, then once more try adjusting the rotation 1 slider. You should find that while the positioner can freely move within the -40° to 30° range, the position will refuse to shift outside of this.
Valid Weld Position within Range
The final configuration is a combination of configurations 1 and 3, which allows you to once again specify a range for the positioner to move within, however this time the position still has to be a valid weld position.
Configuration Combinations
With each configuration now covered, return back the weld settings window and select the Valid Weld Position setting.
You’ll notice that you can specify configurations for the individual workpiece positioner rotators. However, not all combinations of configurations are valid. The table below highlights the valid and invalid configuration combinations:
J1 - Valid weld position |
J1 - Lock to specific value |
J1 - Any value within range |
J1 - Valid weld position within range |
|
J2 - Valid weld position |
Valid |
Valid |
Invalid |
Valid |
J2 - Lock to specific value |
Valid |
Valid |
Valid |
Valid |
J2 - Any value within range |
Invalid |
Valid |
Valid |
Invalid |
J2 - Valid weld position within range |
Valid |
Valid |
Invalid |
Valid |